I want to thank a reader (one of two or three that I have proof exist) for sending in an image to look at and see what we can learn. Before we look at the image let me tell you how I think about blur in an image, so that we can be on the same page.
To me there are mostly three types of blur in an image. There is focus blur, motion blur, and camera shake. Now I'm not writing a text book here so if these terms don't match what you read in the last photography book you read, don't worry too much, I think you'll get the gist of what I'm saying.
Focus blur is a focusing error that causes the intended subject to be out of focus. This happens when the camera decides to focus on some thing that wasn't what you were really trying to photograph. If you have a DSLR this is easier to fix than if you are using a point and shoot where it can be difficult to get it to focus on exactly what you want it to.
Motion blur is caused by your subject or by some thing else in the frame moving enough while the shutter is open to cause blurring.
Camera shake is similar to motion blur since it is related to shutter speed, but the difference is important as we will see soon.
So let's take a look at the image and see what's going on. The image below was taken at a wedding, and the bride and groom have been cut off to protect the innocent of course, not because the photographer didn't know what she was doing.
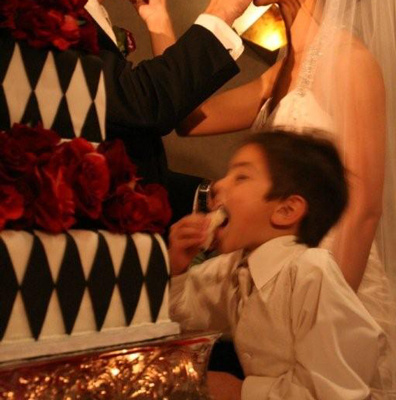
In this image, one of the first things we notice, is that the child is blurred. He seems to really be enjoying his cake. So what we want to figure out is, why is he blurred? To answer that question we can just go down the list of possible causes of blurring.
Focus blur doesn't look like the cause here. Take a look at the child's shirt, and the cake table. We can see that whatever is holding still, seems to be in reasonable focus.
Camera shake also doesn't seem to be the problem here. We know this because again, most of the photograph is actually in focus. If this were a result of camera shake, nothing would be in focus at all.
That pretty much leave motion blur as our culprit.
Now that we know what caused the blurring here we can work on strategy's for reducing problems like this in the future. There are really only two basic things you can do to stop motion blur, and all of the techniques you can think of will come from these two basic things.
You could increase your shutter speed. This would mean widening your aperture, increasing your ISO, or increasing the amount of light. Which one of those techniques you use is entirely up to you, the photographer, and they are strictly artistic decisions, so there aren't really any right or wrong answers. Some will be easier or more less expensive than others, but that's a discussion for another post.
Cheaper and easier still in many cases will simply be to remove any sources of movement in the photograph. This photograph was taken indoors, and one thing that might help is to think about indoor photography carefully. One thing that you might want to keep in mind, is that unless you are carting around flashes and other lighting all the time, whenever you are taking pictures indoor, it's probably a low light situation. This is especially true if it's night time outside and you are relying on the lighting fixtures in a room. This will almost always mean lower shutter speeds and the risk of motion blur. Your best bet might simply be to remove sources of motion from the photograph, like pets, kids, ceiling fans, etc.
If you have a photograph like this one that is making you scratch your head, or if you would like to hear about strategies you can use to prevent problems in your photographs, send me an email and we can talk about it. Until then keep an eye out, or better yet, add my RSS feed to your reader, and eventually I will get around to writing a post about EXIF data. Don't know what EXIF data is? Well whenever there is a break in my college course work I'll tell you, and believe me, it can make diagnosing photography problems a snap.